With the rise of LLMS in the AI world, learning has been democratized and building tools is simple as telling it what you want with some additional nudging.
One useful work flow I have found is to first have the AI perform in-depth research for you if you have no idea about the details around the tools you are trying to build to help you. Then you can have AI build out things for you. Generally called “vibe” coding, a term coined by Andrej Karpathy.
Applications
Here are three different vastly topics and tools that are actually useful created using this workflow.
Diagnosing Electrical Problems around the house.
I am not an electrician and my knowledge cutoff is around highschool level stuff on electrical circuits. So I used the following prompt with a Deep Research Model (Available on Perplexity, Grok, Gemini, and OpenAI). The AI scans 100s of websites for the knowledge and compiles it into a single document for me.
Prompt:
Determine how to wire and diagnose wall switches and electric outlets. Include details on troubleshooting and diagnostics. Include precautions as well.The large language model went out, built a plan, and did some research. Here is what it gave me. This is a small sample, with the full report here.
A Comprehensive Guide to Wiring and Diagnosing Residential Switches and Outlets
Section 1: The Uncompromising Priority: Electrical Safety
Working with residential electrical systems presents inherent risks, including serious injury, electrocution, and the potential for fire if proper precautions are not rigorously followed. While replacing a switch or outlet can often be accomplished by a knowledgeable homeowner, safety must always be the foremost consideration. Understanding and adhering to established safety procedures is non-negotiable before undertaking any electrical task. This section details the essential safety measures required for working on wall switches and outlets.
1.1 Before You Begin: Turning Off Power and Verifying De-energization
The absolute first step before any electrical work is to de-energize the circuit. This involves locating the main electrical panel, commonly known as a breaker box or fuse box, which serves as the central distribution point for electricity in the home. Identify the specific circuit breaker controlling the switch or outlet intended for work and switch it firmly to the "OFF" position. For fuse boxes, the correct fuse must be completely removed. It is advisable to label breakers clearly during this process to simplify future identification.
However, simply flipping a breaker or removing a fuse is insufficient confirmation that the circuit is dead. Hazardous conditions can persist, and accidental contact with live circuits causes injuries and fatalities every year. Verification is mandatory. Use a voltage tester, beginning with a non-contact voltage tester (NCVT), to confirm that power is definitively off at the specific location – the switch terminals or outlet slots – before making contact with any wires or screws. This embodies the critical principle: "Test Before You Touch". A reliable method to ensure the tester itself is working correctly is the "live-dead-live" test: check the tester on a known live circuit, then on a known dead circuit (like the one just turned off), and finally back on the known live circuit. This confirms the tester's functionality throughout the process.
To prevent someone else from inadvertently restoring power while work is in progress, implement a simple lockout/tagout procedure. At minimum, place tape over the deactivated breaker switch as a clear warning.
As you can see, the report is very through. As somebody that doesn’t know the full details, it seemed to be very comprehensive. An expert might find some flaws, or might find it impressive. I think it meets the Pareto principle which is sufficiently good for most applications.
Now for making this useful. This report is informational but messy to use as a tool in real world situations. So I asked a model with “Canvas” mode (offered by Anthropic, Google, Grok, OpenAI) to ingest this document that was created by deep research and to produce a useful tool. Here is the exact prompt I used.
Convert this document into an html/css/js tool that can be used to troubleshoot or diagnose electrical issues.Now most tools will show the results of this direct in the browser, in my case that functionality stopped working for some reason. So I tossed the html into a text editor and saved it as an html document.
What it produced was sort of a questionnaire that helps you diagnose electrical problems, and while not that visually appealing, it can be very useful.

You can view the full tool here.
Based on my general knowledge, this tool is extremely helpful for DIYers and for electricians to double check their knowledge and remove probabilities for mistakes or forgetting something in their repairs.
Visualizing Aerodynamics on 3D Models
I’m working on something that requires me to gain a better understanding of how aerodynamics work and not by watching random videos on it. That isn’t sufficient, I am working on something that requires me to see how what I’m building is affected by the wind. So instead of spending $1000s on software that could do it for me but I won’t understand how to use the software, I had AI build something for me specifically.
This one required multiple prompts to get it right but still impressive.
Prompt:
I'm working on a car and I need a quick review on how aerodynamics work so I can build something efficient. Add details on how wind works, how surfaces affect the wind, and how shapes affect the wind. Include fluid dynamics and other relevant details.It put together a quick basic textbook style document that taught aerodynamics specifically for cars. Here is a sample:
A Comprehensive Guide to Automotive Aerodynamics for Enhanced Vehicle Efficiency
1. Introduction: Why Aerodynamics Matters for Your Car
Defining Automotive Aerodynamics
Automotive aerodynamics is the specialized field within fluid dynamics dedicated to understanding how air interacts with road vehicles in motion. As a car travels, the air it displaces exerts forces upon it; studying these interactions allows engineers and designers to optimize vehicle performance, enhance fuel efficiency, improve stability, and reduce noise. The primary goals involve minimizing resistance to motion (drag), controlling vertical forces (lift or downforce) to ensure stability and grip, and managing airflow for auxiliary functions like cooling and noise reduction. In an era focused on energy conservation and the rise of electric vehicles (EVs) where range is critical, mastering aerodynamics is more crucial than ever for efficient design.

Fundamental Principles: Air Interaction and Key Forces
Air, though invisible, behaves as a fluid and exerts significant forces on a moving vehicle. The two primary aerodynamic forces are:

Drag: This is the force that resists the vehicle's forward motion, acting parallel to the direction of travel. It's the aerodynamic equivalent of friction, constantly working against the engine's power.
Lift: This force acts perpendicular to the direction of motion. It can be positive (lifting the car, generally undesirable as it reduces tire grip and stability) or negative (pushing the car down onto the road). Negative lift is commonly referred to as downforce and is intentionally generated in performance vehicles to enhance traction and cornering capabilities.
The core objective of automotive aerodynamics is to shape the vehicle and manage the airflow around it to minimize drag while controlling lift (ideally achieving slight downforce for stability or significant downforce for performance).
This is useful to understand the concepts but not enough to visualize and apply to real world models. I needed something tangible. So back to my workflow of giving the AI the knowledge if produced to output something useful. Remember to attach the document produced
Prompt:
Create a html/css/js tool that simulates real physics. It should allow you to import obj or other common 3d files. It should allow you to test all of the concepts found in the document like dynamic pressure and coefficient of drag. It should also allow you to do realistic wind testing of the object.This created something like what I was envisioning but it was missing the physics aspect….the particles were flowing right through the object.

So this had to be fixed at the least. There were other improvements like frontal area wasn’t automatically calculated from the model, same for the coefficient of drag but I figured that couldn’t be easy to implement. At the very least I’d like the particles to be affected by the solid 3d object. So I prompted this…
Good start. This is missing the actual physics of the particles interacting with the solid object. Use the formulas from the document to extrapolate how the particles would interact.What it produced is something that now interacts with the 3d model. Now I don’t know enough to know if the interactions are accurate, I’ll have to corelate the formulas to the code. But at initial glance it looks somewhat correct.
- Copyright owned by DeLorean Motor Company (DMC), and NBCUniversal for this general model. This is just an example.
As you can tell, it somewhat works. It still needs more refinement from a utility perspective but at least I can see how changing the model will affect how particles will move around the model. Now I need to change the wind direction to see how it would be going forward.
Here is a link to the tool so you can try it out yourself.
Based on my knowledge of aerodynamics this tool has some utility for my specific applications but probably isn’t useful when building an actual car. However, with some adjustments this probably could be turned into something useful. It certainly can code particle simulations physics better than I can. This is a good example of how AI can help those that don’t have the knowledge, improve their knowledge and understanding. OR It can accelerate the productivity of those that do have the knowledge. I expect somebody that has a good understanding of these concepts could come up with a better prompt to make the physics more realistic reducing the cognitive load to producing a simulation. They can think in their domain language instead of having to learn coding to simulate physics.
Visualize a Marketing Plan
Something I wish I had earlier was a tool that could help me build a marketing plan based on the general knowledge of the internet for a specific niche. In this case, marketing a personal finance app product to drive revenue/sales. I wrote this one in a hurry and it could be refined. Example: “profitable revenue” could be better worded.
Prompt:
Build a marketing strategy for marketing a personal finance app. From inception to achieving profitable revenue.The output from this was a bit overwhelming. It did a fantastic job of determining the competitor landscape and researching the drivers of user growth.
Sample:
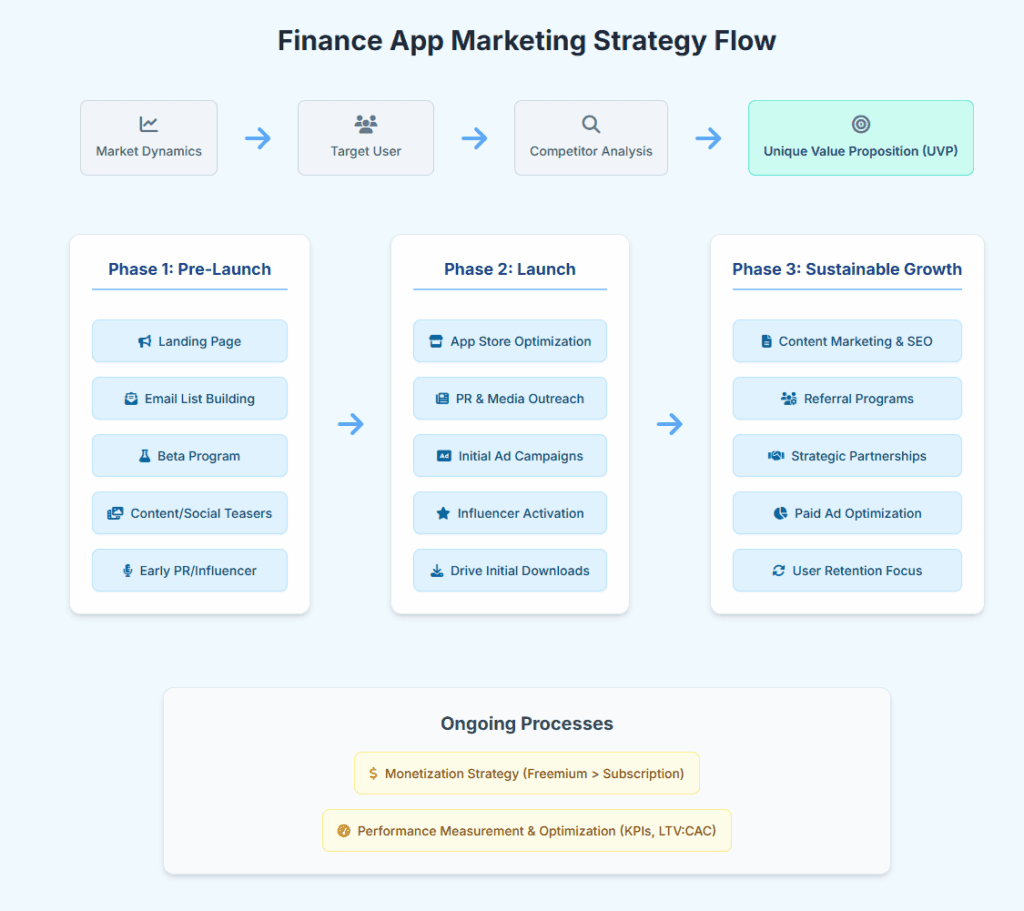
Marketing Strategy for a Personal Finance Application: From Inception to Profitability
I. Executive Summary
The personal finance mobile application market presents a substantial and rapidly growing opportunity, driven by increasing smartphone adoption and a heightened consumer focus on financial wellness. This report outlines a comprehensive marketing strategy designed to guide a new personal finance app from its initial concept through to achieving sustainable, profitable revenue. The strategy emphasizes a deep understanding of the target audience, primarily tech-savvy yet financially stressed Millennials and Gen Z, who exhibit low financial literacy but possess a strong desire for simple, trustworthy guidance delivered via mobile platforms.
Key findings indicate a crowded competitive landscape, yet a significant market disruption caused by the shutdown of Mint creates a timely opportunity for a well-positioned new entrant. The proposed Unique Value Proposition (UVP) centers on delivering simplicity, building financial confidence, and providing accessible education, directly addressing user pain points like financial anxiety and budgeting complexity.
The marketing plan encompasses three core phases:
Pre-Launch: Building foundational momentum through landing page optimization, email list growth, a strategically leveraged beta program, content teasers, and early PR outreach.
Launch: Executing a coordinated go-to-market push involving meticulous App Store Optimization (ASO), targeted PR and influencer collaborations (particularly with 'finfluencers'), and initial paid advertising campaigns across social media and search channels.
Post-Launch: Establishing a sustainable growth engine through high-quality content marketing and SEO (emphasizing Expertise, Authoritativeness, and Trustworthiness - E-E-A-T), user referral programs, strategic partnerships, and continuously optimized paid media.
A Freemium monetization model is recommended as the most suitable starting point to maximize user acquisition, coupled with a robust strategy to convert free users to a premium tier by clearly demonstrating value. Data monetization is strongly discouraged due to the paramount importance of user trust in finance. Success will be measured by tracking a comprehensive suite of Key Performance Indicators (KPIs), focusing on down-funnel metrics like conversion rates, retention, and Lifetime Value (LTV) relative to Customer Acquisition Cost (CAC). Continuous data analysis, A/B testing, and strategic iteration based on performance metrics are critical for optimizing marketing spend and achieving long-term profitability in this dynamic market.
The contents here were a bit overwhelming for me and I wanted to understand the overarching strategy.
Prompt
Create a visual that incorporates all of the components found in this entire document. Use html css and js to make it easy to view.The results of this were underwhelming. It basically took the headers of the report and converted them to accordions that were togglable. So I had to reprompt.
This is a bit disappointing, the intent of the visual is to make it easier to understand the content. Not to convert it into another document with togglable headers. Please modify this so that you can visually see the progression of the strategy and how one tactic feeds into another.This lead to the production of something more useful. It built a visual of a marketing strategy. While I wish it used more from the report and less generalized it was adequate for understanding the bigger picture.
You could argue this could be a general marketing strategy applicable to all software a a service products but closer towards what I was looking for. To improve on this I would ask it to implement and incorporate portions of the report into this.
Conclusion
While most people are prompting how to write emails. The people really taking advantage of this tech are the individuals that know how to elicit information and are experts in their field.
Theoretically you could convert the workflow outlined in this blog post into a single agent which is what I think Google attempted to do with Firebase Studio. But I think unfortunately, their hard coded prompt forces the use and implementation of their Gemini AI which drives product usage and revenue but doesn’t produce the greatest results.
Other examples of this is v0.dev which doesn’t have the deep research component.
AI isn’t replacing too many jobs yet, only the low skill level jobs. It is replacing those that don’t use AI and don’t have skills. There is however progression here through function calling and MCP in the form of agents that can use other tools besides writing text and reading text.
If you found this useful, or want to know more, leave a comment. If you found it to be useless or have a counter argument or want to tell me that I’m using AI wrong, leave a comment.
Sidenote: I used Google Gemini 2.5 pro for all of my prompting for 2 reasons. 1. I have access to it. 2. It has the largest context window which is useful for combining deep research with coding. But theoretically you could do all of this with Grok and OpenAI or even Perplexity. You cannot do this locally unless you have a supercomputer cluster of mac studios and have access to LLAMA 4 and their biggest model. Because context eats up large amounts of memory and requires more processing power for generating the next token.
Interesting thought exercise:
Weigh the cost of hiring a low skill employee to building a mac studio farm that runs agents to write emails, answer calls, take meeting notes, research topics, write code, doesn’t take breaks, makes mistakes like humans do (in the form of hallucinations), learns and doesn’t forget (vector database memory), but has a limit to how much of the memory can be used at once, and consumes electricity instead of food.
Leave a Reply